
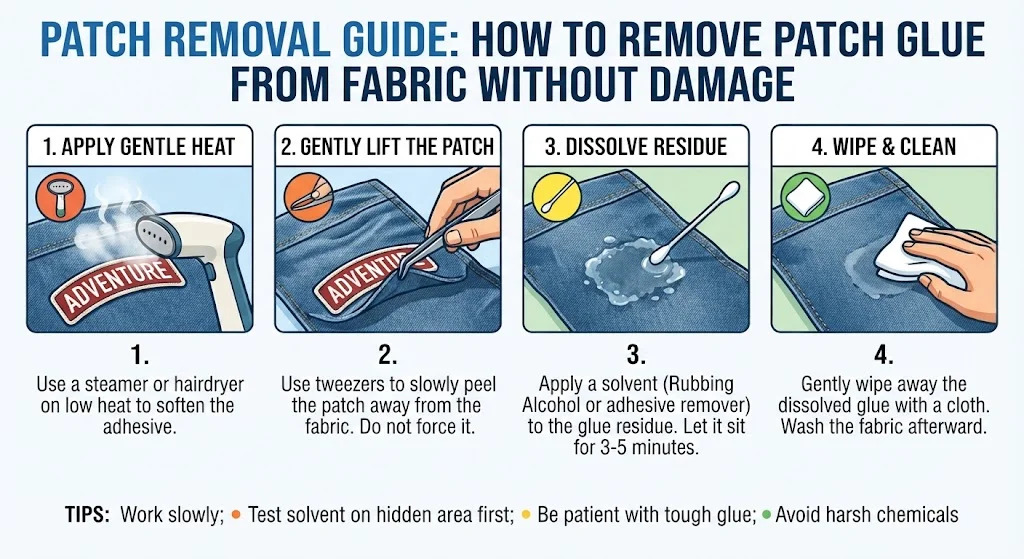
Peel off an old iron-on badge and there’s usually a nasty surprise waiting underneath, a stubborn smear of glue exactly where the patch used to sit. The badge itself is long gone, but that mess it left behind has a habit of hanging about a lot longer than anyone would like.
Whether you’re giving an old jacket a refresh look, swapping out your kid’s scout badges, or updating a work uniform, removing patches is a practical skill to have.
The reason doesn’t really matter. What matters is that knowing how to remove patch glue from fabric properly turns out to be one of those small, oddly useful skills nobody tells you about until you’re stood there with a scraped-up jumper and no clue what to do next.
That’s really what this guide is for. Rather than a single quick trick, it covers a handful of tried-and-tested ways to remove patch glue from fabric depending on what you’re actually working with, cotton, denim, polyester, wool, even the more delicate fabrics that can’t take heat or harsh solvents without complaint.
Why Removing Patch Glue Properly Actually Matters?
Most people treat glue residue off as a minor cosmetic issue, something you can just live with. It’s not, really.
It works against the fabric underneath, meaning how you remove it matters almost as much as whether you bother removing it at all.
The Risk of Leaving Glue Residue Untreated
Leave glue exposed long enough and it starts pulling in dust, lint, what is floating around, until that once-small sticky patch turns into a proper grubby mark, and a harder one to shift than the glue on its own ever was.
If you leave it longer still, the fibres underneath can start to weaken, sometimes even yellow especially on lighter fabrics. It’s the classic case of a five-minute fix turning into something permanent, purely because nobody got round to sorting it for a few months.
Getting the Balance Right Between Effective and Gentle
Most people fall down here, one way or another. Wool, rayon, anything delicate, scrub too hard trying to remove patch glue from fabric and you’ll do more damage than the glue was ever going to.
Fibres pull, the surface goes fuzzy, and there’s no undoing that. Go the other way with polyester or nylon and it’s heat that catches people out. Get that balance sorted, though, and everything after this gets a lot easier. This is where a supplier like The Custom Patches UK helps avoid the glue nightmare entirely.
Understanding the Type of Glue You’re Dealing With
Worth knowing what you’re actually dealing with before diving into removal methods, since patch adhesives don’t all behave the same way.
Heat-Activated Adhesive
It’s on nearly every iron-on patch out there. Heat melts it, it bonds as everything cools down, then hardens back into that shiny, stubborn layer you end up scraping at weeks later. Ironed a badge on yourself at home? Fitted patches onto a uniform? Then yes, this is almost certainly what you’re dealing with.
Pressure-Sensitive Adhesive
This one’s different. No heat needed, it’s tacky straight out of the packet, which is why peel-and-stick patches use it. But when it comes off, don’t expect that same hard, glassy residue heat-activated glue leaves. This stuff tends to come off softer, gummier, honestly a bit messier to deal with.
Fabric-Based Fusible Webbing
Technically, this isn’t even the patch’s own glue. It’s a thin sheet of adhesive webbing sitting between the patch and the garment, usually there because someone fitted a badge at home with a domestic iron rather than through a proper production run.
Step-by-Step: How to Remove Patch Glue From Fabric?
A handful of methods below, work your way up if the mild option doesn’t cut it, especially with fabric you actually care about.
Step 1: Try the Freezer Method First
Safest place to start if you’re not sure what you’re dealing with, no heat, no risk.
- Pop the garment in a sandwich bag, or just wrap cling film round the glued bit.
- Stick it in the freezer for two to three hours.
- Once the glue’s gone hard and brittle, peel or scrape it off with a blunt edge tool like the butter knife or an old plastic card, nothing sharp as it may damage the fabric.
- Brush away any crumbly bits left over with a soft brush.
Works well on wool, silk blends, anything delicate, or fabric with a print nearby that heat would ruin.
Step 2: Apply Heat (For Sturdier Fabrics)
Cotton, denim, anything that can take a bit of warmth, this loosens the bond enough to lift it clean off.
- Lay a clean tea towel over the glue.
- Iron on low-medium, do not steam it.
- Press for 10-15 seconds, lift the cloth straight away, then peel off the softened glue with tweezers or a cloth-wrapped finger while it’s still warm.
- Short bursts, not one long press, or you’ll end up scorching the fabric.
Reverses the original bonding process basically, so it works well when you’re dealing with heat-activated adhesive specifically.
Step 3: Use Rubbing Alcohol or White Vinegar
If the glue is not shifting with temperature alone? A mild solvent is recommended as it usually finishes it off,
- Dampen a cotton pad with rubbing alcohol or white vinegar.
- Dab it on, don’t rub.
- Give it five minutes to soak in and soften things up.
- Scrape gently with a blunt edge, dab again if there’s residue left.
- Test on an inside seam first, as alcohol can mess with some dyes.
This is usually where the stubborn stuff finally gives up, alcohol breaks the tackiness down without leaving that solvent smell.
Step 4: Try Acetone or Adhesive Remover (Synthetic Fabrics Only)
This is the strongest option in the house, but handle it carefully.
- Skip this entirely on acetate, triacetate, most synthetics, acetone will eat through the fabric itself.
- Test on a hidden bit first.
- Apply sparingly, cotton bud, straight onto the glue.
- Wipe off immediately with a clean, damp cloth.
Step 5: Wash as Normal
Once most of the glue’s gone, just wash the garment as you normally would. This will help clear away any remaining residue, lingering smells, or oily marks left behind during the removal process.
Best Patch Glue Removal Methods by Fabric Type:
This is important to understand because various types of custom patches behave differently, depending on fabric type:
| Fabric Type | Recommended Method | Notes |
| Cotton & Denim | Heat (iron) or alcohol | Sturdy enough for most methods; heat works fastest |
| Wool & Knitwear | Freezer method | Avoid heat, which can felt or shrink wool fibres |
| Polyester & Nylon | Low heat + alcohol | Never use acetone, as it can melt synthetic fibres |
| Silk & Delicate Blends | Freezer method only | Test alcohol on a hidden seam before wider use |
| Leather & Leatherette | Rubbing alcohol, light dabbing | Avoid soaking; leather can dry out or crack |
| Canvas & Outdoor Fabric | Heat or adhesive remover | Tough fabric tolerates stronger solvents well |
Why Some Patches Leave Less Residue Than Others?
Most of the advice around glue residue focuses on what you do after the fact, freezer bags, rubbing alcohol, careful scraping. But a fair bit of the problem actually gets decided much earlier, back when the patch is still being made.
Visit the complete guide to The Custom Patches UK and you’ll get to know the same thing. The fewer shortcuts taken during production, the less grief you deal with years down the line.
The Adhesive Grade Actually Makes a Difference
Not all custom iron patch backing is created equal, and it shows up the moment you try to remove one. Cheaper adhesive tends to be thicker and more porous, so it soaks deeper into the weave and leaves that dry, cracked residue that never fully lifts out.
Better-grade adhesive sits more like a thin film on the surface, which bonds just as well while wearing the patch, but comes away far more cleanly if it’s ever removed. It’s not something most people think to ask about when ordering, but it’s worth raising if longevity matters to you.
Fabric Testing Before a Full Production Run
Ordering patches for a whole team or a full run of jackets is a bigger commitment than most people realise, and getting the backing wrong at that scale is expensive to fix. That’s why a small test swatch on the actual garment fabric, cotton twill, polyester blend, tells you far more than a specification sheet ever could.
It shows how the adhesive behaves on that specific material before hundreds of patches go out the door, which means fewer risks and fewer patches getting peeled straight back off.
Getting Placement Right the First Time
A patch that’s stitched or ironed on slightly crooked usually doesn’t stay that way for long, it comes off, and it goes back on somewhere else. Every one of those redos is another chance for glue to build up on the fabric.
Getting sizing and placement confirmed properly at the proofing stage, rather than guessed at when the patch actually arrives, cuts down on how often that cycle happens in the first place.
Tips and Common Corrections
Getting this wrong is easy, so here are a few practical corrections worth knowing before you start removing the patch that was glued:
- Don’t rub aggressively – scrubbing pushes glue deeper into the weave rather than lifting it away.
- Never apply direct heat without a cloth barrier – bare iron contact can scorch fabric or melt synthetic fibres instantly.
- Always patch-test solvents first – a hidden seam or inside hem is the safest spot to check for colour fading.
- Work in small sections – trying to treat the whole glued area at once often leads to uneven results.
- Avoid mixing chemicals – combining vinegar, alcohol, and acetone in sequence without rinsing between steps can react unpredictably.
- Let the fabric dry fully before deciding it’s finished – some residue only becomes visible once the fabric has dried out.
- Choose sew-on or Velcro backing next time – if a patch is likely to be swapped or removed again in future.
Why Choose The Custom Patches UK for Your Patch Projects?
Free Design Proofs Before Anything is Produced
Every order includes a free digital proof, so the size, colours, and backing type are agreed before production starts, removing the guesswork that often leads to a mismatched patch being removed and reapplied.
Low Minimum Order Quantities
With a minimum order of just 10 pieces, small teams, clubs, and individuals can order exactly what they need, rather than being stuck with excess stock of a patch design they later decide to change.
Fast Turnaround and Free Shipping
Most orders are completed within five business days of proof approval, with free shipping included across the UK, useful for anyone working to a tight deadline for uniforms or events.
A Wide Range of Patch Styles
From custom embroidered patches and chenille to PVC, woven, and leather, the range means the right material can be matched to the right use case, whether that’s a rugged outdoor jacket or a smart corporate uniform.
Frequently Asked Questions
Will removing patch glue mess with the colour of my fabric?
No, if you’re careful, test any solvent on a hidden seam first and steer clear of direct high heat.
Does the freezer trick actually work on any fabric?
Yes, it’s one of the safer options going since there’s no heat or chemicals involved at all.
Is rubbing alcohol going to ruin a coloured garment?
Usually not, but test it on an inside seam beforehand as a safety concern.
How long before heat loosens the glue?
10-15 second bursts are normally enough to get heat-activated adhesive moving.
Is acetone safe to use on any synthetic fabric?
No, it can eat through acetate and similar materials, so steer well clear there.
What backing should I use so this doesn’t happen again?
Sew-on or Velcro, both available through The Custom Patches UK, skip the heavy adhesive altogether.
Can I just wash the glue out instead?
A normal wash tidies things up after you’ve already lifted most of the glue, but it won’t do the job alone.
Do I need anything fancy to sort this out at home?
No, a blunt knife, some cotton pads, and anything under the sink, vinegar or rubbing alcohol, does the work.
Getting It Right the First Time
Removing patch glue from fabric without wrecking it isn’t complicated, it just takes a bit of patience. Match the method to the fabric, start gentle, and only bring out the stronger stuff if you genuinely need to.
Follow that and you won’t end up with scorch marks or a patch of fabric that’s gone stiff and never quite recovers. Here’s the thing though, the real fix isn’t removal at all, it’s not needing to remove anything in the first place.
Get the backing right from the start, sew-on, Velcro, and you skip the sticky mess entirely. The Custom Patches UK does exactly this, matching backing to how a patch will actually be used so it stays looking sharp without the glue headache down the line.